使用 Render 平台部署前后端分离项目的指南
Render 是一个功能强大的平台,允许用户方便地部署各种类型的网站,包括静态网站、动态网站和前后端分离项目。本文将详细指导您如何在 Render 上成功部署您的前后端分离项目。
前期准备
在开始之前,请确保您的项目满足以下条件:
- 创建 Render 账户:访问 Render 注册页面 创建一个账户。
- 项目存储:您的代码应托管在以下任一平台上:
- GitHub、GitLab 或 Bitbucket 上的代码仓库
- 在支持的注册表中如 Docker Hub 上的 Docker 镜像
- 本地测试:确保您的整个应用在本地能正常运行。
- 查阅文档:请阅读您所使用框架的文档,以获得特定的部署指导。例如,这是 Next.js 部署指南。
项目架构概述
在 Render 中,您可以将前后端分离项目划分为以下几个组件:
- 前端:使用 React 或 Next.js 开发的网页。
- 后端:使用 Express 或 Django 构建的 API 服务器。
- 数据库:用于应用数据的长效存储。
我们可以将这些组件作为单独的服务在 Render 中部署,如下表所示:
| 组件 | 服务类型 | 常用框架 |
|---|---|---|
| 前端 | 静态网站(或者在包含服务器端逻辑的情况下选择 Web 服务) | React、Next.js、Vue.js |
| 后端 | Web 服务 | Django、Express、FastAPI |
| 数据库 | Render PostgreSQL 数据库 |
示例
接下来,我们将循序渐进地部署一个包含上述组件的应用,您可以按照同样的步骤应用于您自己的项目。
部署步骤
1. 创建数据库
Render 提供完全托管的 PostgreSQL 数据库,具备 时间点恢复 等可靠性功能。通过以下步骤轻松创建一个 Render PostgreSQL 数据库:
- 登录 Render Dashboard。
- 选择“新建数据库”并根据提示完成设置。
完成后,请继续下一步。
2. 部署后端
后端负责处理来自浏览器和其他客户端的 HTTP 请求。为此,我们需要创建一个 Web 服务。
确保后端代码在启动时绑定到 host
0.0.0.0上的 HTTP 端口。建议绑定到环境变量PORT的值(默认值为10000)。如果您使用 Docker 构建后端,应在 Dockerfile 中指定端口:
1EXPOSE 10000在与数据库相同的区域中创建新的 Web 服务,并部署后端代码。请遵循 这些步骤。
3. 部署前端
前端用于展示用户在浏览器中查看和互动的内容。
根据前端的框架,您将代码部署为 静态网站 或第二个 Web 服务。
| 服务类型 | 使用场景 | 示例框架 |
|---|---|---|
| 静态网站 | 完全静态内容(HTML/CSS/JS)的应用 | React、Vue.js、Next.js(仅静态导出) |
| Web 服务 | 包含服务器端逻辑的应用 | Next.js、Nuxt.js |
为了获得最佳性能,我们推荐为任何支持的框架使用静态网站,因为 Render 的静态网站由全球分布的 CDN 提供服务。
请按照您选择的服务类型的说明进行部署:
4. 连接服务
部署服务后,您需要配置它们之间的连接。为此,请根据功能设置环境变量,以指定每个服务连接到的其他服务的地址。
更新前端服务
获取后端服务的 公共 URL。
添加环境变量 到前端服务:
- 给环境变量起一个有意义的名称(例如
BACKEND_URL),并将其值设置为后端的公共 URL。 - 对于静态网站框架,您可能需要使用特定的名称(例如 React 应用中使用
REACT_APP_BACKEND_URL)。
- 给环境变量起一个有意义的名称(例如
在前端代码中使用新的环境变量连接后端。例如,在 JavaScript 中:
1
2
3
4
5
6
7
// 使用 BACKEND_URL,如果未设置则默认为 localhost const BACKEND_URL = process.env.BACKEND_URL || "http://localhost:4000"; // 获取后端数据的基本示例 fetch(`${BACKEND_URL}/api/data`) .then(response => response.json()) .then(data => console.log(data));将更新后的代码推送到关联的分支以重新部署。
更新后端服务
获取前端服务的公共 URL。
获取 Render PostgreSQL 数据库的 内部地址。
- 后端服务之间可以使用其“内部”地址(或“私有”地址)进行通信,确保数据在私有网络中传输。
添加环境变量 到后端服务:
- 定义变量
FRONTEND_URL,将其值设置为前端的公共 URL。 - 定义变量
DATABASE_URL,将其值设置为数据库的内部地址。
- 定义变量
更新后端代码以使用
FRONTEND_URL和DATABASE_URL环境变量。例如:1 2 3 4 5 6 7 8// 使用 FRONTEND_URL,如果未设置则默认为 localhost const FRONTEND_URL = process.env.FRONTEND_URL || "http://localhost:3000"; // 设置 CORS 头以允许来自前端的请求 app.use((req, res, next) => { res.setHeader("Access-Control-Allow-Origin", FRONTEND_URL); next(); });1 2 3 4 5const { Pool } = require("pg"); const pool = new Pool({ connectionString: process.env.DATABASE_URL });将更新后的代码推送到关联的分支以重新部署。
完成这些步骤后,您的应用应该能够正常运行!访问前端 URL 确认部署成功。如果遇到任何问题,请查看 部署故障排除 页面以获取帮助。
通过按照本指南的步骤操作,您可以轻松在 Render 平台上设置和部署前后端分离的项目,并充分利用其提供的强大功能。希望这能够帮助您顺利完成项目的部署!
Multi-Service Architectures on Render
This guide teaches you how to:
- Combine different Render service types into a common web app architecture
- Set up connections between services using environment variables
- Communicate between services over a private network
Modern cloud applications usually consist of multiple connected services:
A multi-service architecture like this one enables you to deploy, scale, and even swap out individual parts of your app—all with minimal impact on the rest of your system.
The Render platform is designed from the ground up to support multi-service architectures. You can assemble different service types into any combination you need, using any set of languages and frameworks.
Let’s look at an example.
Example scenario
A common multi-service web app might consist of:
- A React or Next.js website for the app’s frontend
- An Express or Django API server to handle requests from clients
- A relational database for long-term storage of application data
We can represent each of these components as a separate service on Render:
| Component | Service Type | Common Frameworks |
|---|---|---|
| Frontend | Static site (or a web service if the frontend includes server-side logic) | React, Next.js, Vue.js |
| Backend | Web service | Django, Express, FastAPI |
| Database | Render Postgres database |
Let’s walk through deploying an app with these components. You can apply these steps to your own app, regardless of which frameworks you use.
Prerequisites
Before we start deploying, confirm all of the following:
- You’ve created your Render account.
- Each project you want to deploy is one of the following:
- A repository hosted on GitHub, GitLab, or Bitbucket
- A Docker image in a supported registry, such as Docker Hub
- Your full application works as expected on your local machine.
- You’ve consulted your chosen framework’s documentation for specific deployment guidance.
- For example, here’s the deployment guide for Next.js.
Steps to deploy
In the steps below, we’ll first deploy each component of our architecture. Then, we’ll connect them by setting environment variables.
1. Create a database
Render provides fully managed PostgreSQL databases with point-in-time recovery, along with reliability features like read replicas and high availability for larger instances.
We can create a Render Postgres database with a few clicks in the Render Dashboard:
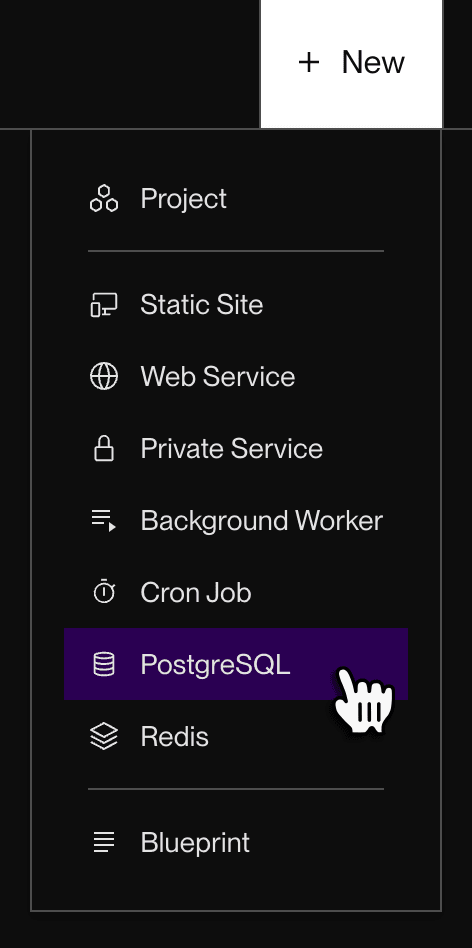
Follow these steps, then return here.
2. Deploy the backend
Our application’s backend will handle incoming HTTP requests from browsers and other clients. To support this, we’ll create a web service.
Web services receive a public onrender.com URL, and you can add your own custom domains. You can use virtually any web framework for your web service (Django, Express, FastAPI, and so on).
To deploy a backend that only receives traffic from your own Render infrastructure, create a private service instead.
Make sure that on startup, your backend code binds an HTTP server to a port on host
0.0.0.0.We recommend binding to the value of the
PORTenvironment variable (default10000).If you’re building from a Dockerfile, indicate your HTTP port in the file like so:
1EXPOSE 10000Learn more about the
EXPOSEinstruction.
Create a new web service in the same region as your database and deploy your backend code to it.
- Follow these steps, then return here.
3. Deploy the frontend
Our application’s frontend will serve the content that users view and interact with in their browser.
Depending on our frontend’s framework, we’ll deploy our code as either a static site or a second web service:
| Service type | When to use | Example frameworks |
|---|---|---|
| Static site | For apps with entirely static content (HTML/CSS/JS) | React, Vue.js, Next.js (static exports only) |
| Web service | For apps with server-side logic | Next.js, Nuxt.js |
Render static sites are served by a globally distributed CDN, so we recommend using them for any framework that supports it.
To deploy your frontend, follow the instructions for your chosen service type, then return here:
4. Connect your services
After creating and deploying our services, we need to configure them to communicate with each other. To do this, we can set environment variables on a service to specify the address of each other service it connects to:
Let’s set up connections for our frontend and backend services.
Update the frontend service
Look up the public URL of your backend service.
Add an environment variable to your frontend service:
- Give the environment variable a helpful name (such as
BACKEND_URL) and set its value to your backend’s public URL. - For static site frameworks, you might need to use a specific name for the environment variable (such as
REACT_APP_BACKEND_URLfor React).
- Give the environment variable a helpful name (such as
Update your frontend code to use the new environment variable to connect to your backend. For example, in JavaScript:
1 2 3 4 5 6 7// Use BACKEND_URL if set, otherwise default to localhost const BACKEND_URL = process.env.BACKEND_URL || "http://localhost:4000"; // Basic example of fetching data from your backend fetch(`${BACKEND_URL}/api/data`) .then(response => response.json()) .then(data => console.log(data));Push your updated code to your linked branch to deploy your changes.
Update the backend service
Look up the public URL of your frontend service.
Look up the internal address of your Render Postgres database.
- Backend services on Render can communicate with each other using their “internal” (or “private”) addresses. When you use an internal address, traffic between the services stays on their private network—it doesn’t traverse the open internet.
Add environment variables to your backend service:
- Define a
FRONTEND_URLvariable and set its value to the frontend’s public URL. - Define a
DATABASE_URLvariable and set its value to the database’s internal address.
- Define a
Update your backend code to use the
FRONTEND_URLandDATABASE_URLenvironment variables to connect. See examples below.Using
FRONTEND_URLto set CORS headers in Express middleware:1 2 3 4 5 6 7 8// Use FRONTEND_URL if set, otherwise default to localhost const FRONTEND_URL = process.env.FRONTEND_URL || "http://localhost:3000"; // Set CORS headers to allow requests from the frontend app.use((req, res, next) => { res.setHeader("Access-Control-Allow-Origin", FRONTEND_URL); next(); });Using
DATABASE_URLto connect to a database with thepgNode.js library:1 2 3 4 5const { Pool } = require("pg"); const pool = new Pool({ connectionString: process.env.DATABASE_URL });
Push your updated code to your linked branch to deploy your changes.
After your frontend and backend deploys complete, your app should be up and running! Visit your frontend URL to confirm. If you encounter any issues, see Troubleshooting Deploys.